
As well as the usual first impressions, reviews, swatches and what not…all that good stuffs here to stay obviously, but I really wanted to bring some different and more artistry focused content your way this year too! After all, it’s what I do and quite a few of you have asked for more of this kind of stuff…so here you go! I’m yet to venture in to the cringe world of listening to my own voice on video (anyone else?!) but watch this space, it’s a possibility…in the meantime, these how to/ step by step posts can be useful and are great when it comes to helping you experiment/ get out of your comfort zone and have fun creating whatever your skill level!
Starting off with a pretty simple, but super effective eye look…it has lashes, flattering smoke and a pop of glitter…what’s not to love?! I’ll be breaking it down in to (hopefully!) easy to follow steps and using universally flattering shades that can be switched up depending on personal preference/ eye colour. I’ll be going through what I’ve used but as always…use what you have! If you have a similar tone in another shade/ brand, use that instead!
So we need to see the end result, the fruits of our blending and here it is…
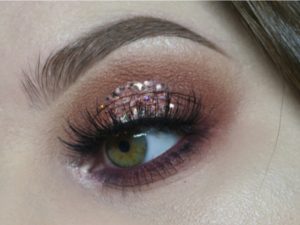
This is one of my favourite looks to do, can be adapted to work on any eye shape and always looks good whatever the occasion! Pair it with glowy skin and a nude lip (my usual!) for effortless glam or with a stronger contour and statement/ dark vampy lip for some of that extra drama llama!
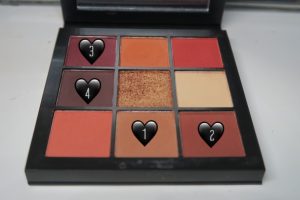
For this look I’ve used the Huda Beauty Warm Brown Obsessions Palette and have numbered the shades seeing as they have no individual names (I hate that, do you??) so it’ll hopefully give you a better idea, along with the eye pics themselves about the shades I’ve used and in which order. These little Huda Beauty Obsessions Palettes (there’s 4 colour waves in total) are gorgeous…pigmented, easy to work with and you can read more about them here.
Let’s get started anyway…
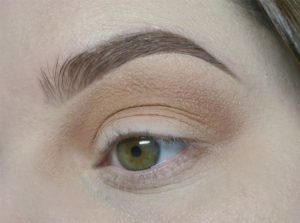
Starting off with eyebrows done, eye area primed from lash to brow and set with a neutral skin tone matte shadow to set whatever you’ve primed with. Applying shadow on to a less tacky base will make it so much easier to control and give you a smoother blend! You can use concealer, eye primer or both…whatever you prefer, you just want a smooth, even canvas to work with. Using a large fluffy blending brush, apply the first light-mid tone matte transition shade (1) in to the crease. You don’t have to be too precise with anything here, we can clean up later…especially because we’ll be using glitter later which is fall out guaranteed! Use a really light hand (hold the brush as far up the handle away from the bristles as you can) and let the brushes do the work! Go between small circular motions and windscreen wiper movements for a perfect blend.

Next up we want to deepen that crease so using a medium sized blending brush, go in with the slightly deeper mid tone matte transition shade (2)…applying this over the first shade, but don’t blend this one as high. A good basic rule for mostly any eye makeup, is the deeper the shade the smaller the brush and closer to the lash line you should be. Remembering this will help with your brush selection when you’re faced with loads of options!
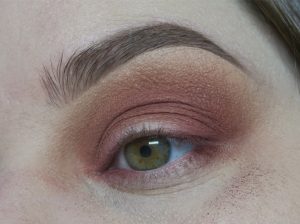
Then as well as deepening that crease up further, we want to deepen up the corners of the eyelid really smoke the whole look up. Using a small blending brush go in with a mixture of the 2 deepest shades (3 & 4) slightly bellow the crease and then gradually build up the inner and outer corners using the same brush and a patting motion (this will allow you to build more depth with your shadows). You’ll be left with a lighter space in the middle of your eyelid…don’t panic, all good and we’re going to cover it with glitter anyway!
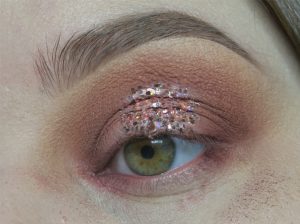
You can go straight in with metallic shadow if you’re in a rush or want to, but I like to prep the area first. Doesn’t matter if I’m using a metallic shadow or full on glitter…I’ll always use a bit of concealer on the area first to make whatever it is pop! Use a small firm brush and pat a bit of concealer (matte finish and full coverage is better, similar to when you do a cut crease) to the centre of your lid, I usually use Tarte Shape Tape or Kat Von D Lock It Concealer Creme (UK* / IE*). Follow that with some glitter glue over the top…the NYX Glitter Glue* is my go to and over that (while it’s still tacky) pat on either your metallic shadow or glitter. Here I used one of the brand new Spring/ Summer 2018 glitter mixes from Glitter Express (they kindly sent me loads of new mixes to try so expect glitter overload in the coming weeks haha) called ‘Ollie’…a small chunky light rose gold glitter and finer holographic rainbow glitter mix, so pretty!
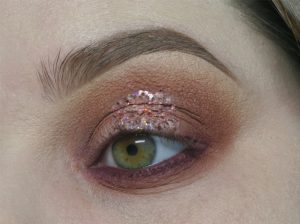
When you’re going heavier up top, it looks so much better if you balance it underneath! You can go in with a soft smudge of shadow through your lower lashes or do like I did and smoke it up! Using the same principle as the top lid…start off with a bigger brush/ lighter shade and finally a smaller smudge brush with the darkest shade. I used all the same shades as I did on top. I didn’t feel like grunging it up as much this time with black, so instead went in to my waterline/ tight line and through my lower lashes with Kat Von D Beauty Everlasting Lip Liner in Homegirl (UK* / IE*) a deep pink purple tone liner that gave extra definition but kept it softer and really enhanced my green eye colour too.
I didn’t use any liner along the top lash lane, but do most of the time…can’t resist a big ole wing! Use plenty of mascara, I can’t get enough of the Ciate Wonderwand Mascara it’s the most perfect, extreme volume but non cloggy mascara there is and it’s not talked about enough! You don’t have to (just load up on mascara if you prefer) but I went for a set of Koko Lashes in Queen B (Another kind gift, this time from falselashes.co.uk) just for a bit more drama. Especially when you’re not wearing liquid liner, but in general in my opinion lashes just make any look more complete.
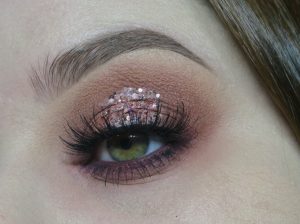
That’s it…done! The only other things left to do are clean up any fall out (use a wipe and/or go back in with foundation/ concealer) and highlight your inner corner and a little bit on the brow bone if you like…I used the same highlight that I use on the rest of my face, Glazed Donut* the collab between Ofra Cosmetics and Nikkie Tutorials…it’s my go to and is stunning!! Perfect for fairer skin tones and there’s darker shades available too, something for everyone!
Hope this made sense and was somewhat useful! Let me know if there’s any specific step by step’s you’d like to see or even if there’s any particular product you want to know how to use/ get the most out of. More of these type of posts to come anyway and as always keep an eye out on my Instagram…that’s where I mainly post my makeup looks, go check it out!
Lyd x
PLEASE NOTE:
I’m now based in Cork, Ireland. Although I do still take select bookings for North Wales/ Cheshire and Dublin (get in touch for more info) and am available to travel country wide…I’m mainly taking makeup bookings for Cork City and surrounding areas.
As a bridal makeup specialist, I do get booked up well in advance so if you’re looking for wedding makeup in Cork contact me asap to check availability, secure your date and avoid disappointment! I’m freelance and travel to your home/ venue of choice.
Also available for makeup for any occasion/ event, lessons and master class makeup…find more information and a full list of services here.
Contact us for enquiries/ bookings and we’ll get back to you as soon as possible.
Cruelty free.