
As the title suggests, I thought it was about time I put together one of these…a definitive guide of what you could (not should…everyone’s different and you all have your own preferences so take from this what you need personally, it doesn’t have to be everything!) include in your any day, everyday/ ‘go to’ makeup bag/ collection to make it well rounded and mean that you can put together pretty much any look for any occasion or mood and without trying to scramble though and be overwhelmed by a multitude of unnecessary options! Sure you can ‘shop your stash’ and dip in to your full collection/ switch things up as you fancy, but this’ll make your getting ready way less stressful and quicker…truth!
Obviously insert your own choice of skincare here and then we’ll go straight in to…
✖PRIMERS –
I use a face primer and eye primer for all makeups…I personally bypass lip primer and lash primer because lip balm and a decent mascara (more on those later) although face and eye primers are well worth it if you want your makeup to look great and stay put all day!
Make sure you choose a primer that’s going to work with your own skin type and foundation formula. You can always use different primers for different areas too, I sometimes use an oil control primer on my oily nose (Urban Decay’s De-Slick (UK* / IE*) works really well) and then my usual everywhere else. I usually go between the Kat Von D Lock It Hydrating Primer (UK* / IE*) because it works great with most of my foundations, gives moisture without being too much and makes makeup last/ stay fresh…and the Becca Backlight Priming Filter* which is perfect for if my skin’s looking a bit flat and needs some extra glow! A more hydrating primer like these will keep your skin looking plump and can stop fuller coverage foundations looking heavy too!
Eye primer for me is always a tinted one! Eyelid skin is thin and if like mine, can have discolouration/ redness…something tinted will even out tone, give you an even canvas to work on and generally make you look more awake even if you’re not wearing shadow over the top. I always go back to Urban Decay’s Eyeshadow Primer Potions, specifically the shade Eden (UK* / IE*) for all day eye makeup wear.
I’m also a fan of NABLA Cosmetics Crème Shadows…there’s so many shade options, matte and shimmers too. I generally use the shade Underpainting which is a great cruelty free alternative/ dupe to MAC’s Soft Ochre, there’s also Morning Glory (tee hee) which is a CF twin of MAC Painterly.
✖BASE –
If you don’t wear foundation, skip this step…if you do, going for a fuller coverage formula along with a lighter BB or CC will do you right for any given skin situation. I don’t generally wear a huge amount of either, because you can always add concealer for more coverage without going really heavy.
Day to day I’ll go for something with a light texture, but decent natural coverage and long wear like the IT Cosmetics CC Cream which also has the bonus of a high SPF…essential my friends! Most brands now do their own version of a BB (beauty balm) or CC (colour correcting) cream and you don’t have to spend a lot either. Superdrug have some brilliant affordable and cruelty free own brand versions!
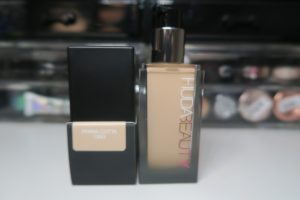
I like to have a fuller coverage option to hand for days when it’s just needed, night out/ events and for when you just want flawless in a hurry! Like I touched on before, I only ever really use a small amount…start off with one pump and go from there. Even when full(er) coverage happens, I still like my skin to look and feel like skin! I’ll usually throw in one of these…Kat Von D Lock It Foundation (UK* / IE*), Fenty Beauty Pro Filt’r Foundation or Huda Beauty Faux Filter*…they’ve been my top 3 fuller coverage foundations for ages now. (I have full reviews/ swatches and info on all 3 on here – Kat Von D – Fenty Beauty – Huda Beauty) All have a slightly different coverage/ finish (although all med-full) but all long wearing and skin perfecting.
✖CONCEALER –
A liquid concealer offering a fuller coverage is my weapon of choice. You can go for a brightening liquid for your under eye and a richer cream for blemishes, as many as you want but I like a one hit wonder (for under eyes and any blemishes) that’ll do all the things as well as saving space in my bag. I have sooo many liquid concealer favourites (maybe I’ll do a post about all??) and am a concealer junkie (but you’ve probably noticed that ha), so it’s always a task to pick just one! Anyway, right now it’d most likely be the Makeup Revolution Conceal & Define Concealer…it’s so good and only £4! Read more about it here.
✖POWDER –
Lock that face down! Even if I don’t set my whole face (I usually do though…hello oily nose), I’ll still always set my under eye concealer to prevent creasing and eye makeup smudging. I like to have a pressed powder compact for touch ups (Kat Von D Beauty Lock It Blotting Powder (UK* / IE*) is the one!) but prefer a lightweight loose powder for setting and something that won’t leave my skin looking flat. It’d take a lot to beat the KVD Lock It Setting Powder (UK* / IE*) in my opinion…it’s for all skin tones too and won’t alter the colour of your base or cause flash back (that unattractive white cast) in pictures either.
✖CONTOUR/ BRONZE/ BLUSH –
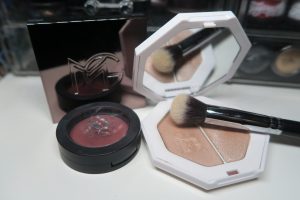
You might wear all, some or none of these…but I think they’re pretty important steps in your makeup routine, adding back in warmth and dimension so your face doesn’t end up looking flat! I don’t always use blush, but if I do it’s usually the Kat Von D Lolita one (UK* / IE*) which also doubles up as eyeshadow (just use the tiniest bit, it’s all you need!). NABLA Cosmetics do lovely pigmented and super blendable blush too, I love the shade Nectarine…both of these (Lolita and Nectarine) are pretty universal shades if you’re in the market for a new blush.
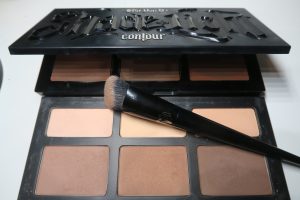
I’m definitely more of a contour and bronze kinda gal, even on my pale skin! A good bit of natural (well blended! I’m not about that harsh striped life!) contour benefits all! You could go cream or powder, or both like me…I don’t always use both together, but like to have the option. My go to’s for contour are both from Kat Von D Beauty…the Shade + Light Contour Palettes in Powder (UK* / IE*) and Crème (UK* / IE*) versions. Cult products for a reason (both pigmented, both easy to blend)…obviously you don’t have to have full palettes, but I like the option of shades and do use them for colour correcting (creams) and on the eyes too.
Even if you don’t contour (and also a makeup bag essential if you do in my opinion) a good bronzer will give you shape, warmth and make you look healthy and alive. I really like the Makeup Geek Bronze Luster Bronzer* for a natural, buildable glow. I use the lightest shade Sun-Kissed but all 3 shades have the most beautiful bronze tone, matte not flat and without making you resemble an Oompa Loompa!
✖HIGHLIGHT –
So excited about this bit…you know me and my (borderline unhealthy) obsession with highlighters! Cream, liquid or powder, the choice is yours and totally personal preference. I have all kinds although own way more powder ones and do prefer powder myself. I don’t think you can beat the staying power, especially as my skin is more combo/ oily (you might want to try a cream or liquid if your skin’s on the drier side). Out of all of the highlighters I own, one of my favourite (and beautifully blinding) formulas is the Ofra Highlights*…they have shades to suit all, Glazed Donut* is probably my most used Ofra and looks perfect on fair skin tones! Another inclusive (something for everyone) brand worth checking out is Fenty Beauty and specifically the Killawatt Freestyle Highlighter Duos…I love the shade Lightening Dust/ Fire Crystal…they allow you to go as everyday subtle or as blinding as you dare with having the softer and stronger option in the same compact. They’re a cream-powder hybrid formula, so never cake and last all day/ night, perfect!
✖BROW PRODUCTS –
I’ve said it before and’ll say it again…if you only have time to focus on one face area, make it your brows and you’ll instantly look more groomed and put together! You don’t need loads of products, just your choice of colour/ definition and a clear brow gel (the Anastasia Beverly Hills Clear Brow Gel* is by far the best one I’ve tried, but there are plenty of great, more affordable options out there too!). I pretty much always use a pomade/ gel and brush, it’s waterproof and can be used for natural everyday definition or for a more defined brow. I love the Inglot AMC Brow Gels (UK / IE) or the Anastasia Beverly Hills Dipbrow* and always use my ABH 14 Dual Sided Brow Brush* with it…spoolie on one end to groom and a finer than any other angled brush to apply your gel on the other end.
Anastasia do some great fine pencils (Brow Wiz*) if you prefer and NYX and NABLA do some great (also cruelty free) affordable alts too.
✖EYESHADOW –
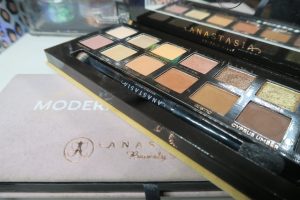
Eyeshadow preference is such a personal thing. I have loads of posts on here about different eyeshadow palettes including full swatches, if you need any inspo check them out! There’s always the option to build a palette yourself with so many single shadow pans available out there now as well as a multitude of ready put together beauties for you to choose from! When you’re picking out your go to/ everyday/ travel palette, you need to think about your own style and what YOU like to wear! Me for example…I prefer grungy neutrals and love me some burgundy reds to bring out my green eyes. If I have the KVD Lolita Blush with me, I’ll use that along with the KVD Shade + Light Eye Contour palette (UK* / IE*) or either the Anastasia Beverly Hills Modern Renaissance* or Soft Glam Palettes…both neutral, with warmer tones and those grunge giving dark tones that I love! Build it yourself or choose a palette, you at least want something with a matte skin tone shade for setting/ erasing, at least one transition shade (light to mid tone, neutral matte) to blend everything together, a pop shade (this can be any shade, texture and depth you fancy, but will be the main colour ‘jist’ of your look) and a dark definition shade…for smoking things up or using as a soft definition/ liner. A black is always handy too. Cohesive is key…choose a selection of shadows that you can mix and match to suit any mood/ occasion.
✖EYELINER/ MASCARA –
Which brings me on to liner and lash definition! I like a liquid for wings that could cut and a pencil to create smokey drama along my lower lash line as well as for tight/ water lining. You can use both, either or none of course but liner will have your whole eye look come together, make your eyes look brighter, bigger, sultrier…all the things! Liquid needs to be precise, super black and waterproof (damn you eternally watery eyes!) so’ll be either Kat Von D Tattoo Liner in Trooper (UK* / IE*) or the NYX Epic Ink Liner* both are incredible and tick all boxes for me. Pencils need to be rich in pigment, creamy/ easy to smudge/ blend and long wearing which means I always go for Kat Von D Everlasting Lipliners (UK* / IE*) in Skully (black) and Crucifix (chocolate brown)…yes they’re technically lipliners, but can be used anywhere and again do all the things I need them too and better than a lot of actual eye pencils I’ve tried!
Mascara…you do you and choose what suits you best. Something that works for some might not work for another, just choose your fave and you’re good to go! I love the Ciaté London Wonderwand Mascara which is a great all rounder!

✖LIP PRODUCTS –
Again the lip products you go for are going to be very much down to personal preference, just be mindful of your blush/ eye shadow choices and make sure everything will go together whatever you go for on any given day. I always have a lip balm in my makeup bag…any you like works and as well as hydrating your lips, it’ll keep them in the best condition for lip colour. I don’t often wear a bright lip, sometimes a dark lip might happen but I’m all about the nude. I know myself that I’ll end up carting 50 million lip products around and actually using 2, so stick in a gloss (great for wearing solo for quick and easy or for adding sheen to a matte lip) which is often a NYX Butter Gloss* and my current favourite matte nude…has to be a Kat Von D Studded Kiss Crème Lipstick (UK* / IE*) in Ludwig or Bow N Arrow. I’ve spoken about these 2 shades so much but can’t get enough!
If you use lipliner, go for a good neutral to suit your skin tone and any lip colour and if you’re a bold lip fan, stick in your favourite shade.
✖TOOLS/ BRUSHES/ EXTRAS –
You can do so much with a Beauty Blender (I use the NYX one* most often) and it’ll save you valuable space and time getting ready. I like to always have the KVD Lock It Edge Foundation Brush (UK* / IE*) on hand for cream contouring too. A powder brush or 2 for setting powder/ contour/ bronzer/ blush (you can use your blender for any of these too), a brow brush/ spoolie and for eyes…a large blending brush, a medium shading brush and a small (ish) smudge/ detail brush are key and then add an angled brush if you want to cover all bases. Obviously this is minimum really (you can always add in extras, I’ll always have a few extra blending brushes to hand and they don’t take up much space) but it means you should be able to create pretty much anything!
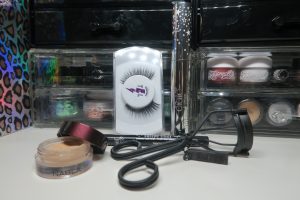
Tweezers for obvious reasons as well as assisting in false lash application if you wear them. I’ll usually have a pair of lashes in my makeup bag for if the mood/ occasion needs them. I like to have a naturally full set of silk lashes (cruelty free/ vegan ofc…I don’t do mink lashes full stop) on standby, like the Lonewolf Cosmetics Lashes in style The Queen which are gorgeously fluffy, add quick and easy natural drama and feel super comfy to wear too (don’t forget glue if you include a lash!). You can carry a lash scissor, but quick tip and to save carrying them around…I pre trim all my lashes to fit.
An absolute essential in my opinion is a good lash curler (you can read more about them here) and the best one I’ve tried hands down is the Surratt Revelee Lash Curler* which is a bit spendy (see the previously linked curler post for an affordable alt) but worth every penny for the most lifted lash ever!
Last but not least…a setting spray! These are great for prepping skin for makeup, setting (ofc) and can be used for all sorts of extra things…grooming brows, making eyeshadow more intense and even dampening your blender if you’re nowhere near a sink to name just a few. I like (and use everyday) the KVD Lock It Makeup Setting Mist (UK* / IE*) which also comes in a mini travel friendly version (UK* / IE*) too!
Hope this makeup bag breakdown has helped and you can take something from it. It’s something I get asked about a lot…I think most people take one look at my pro kit and presume that’s what my own makeup bag looks like too…now I do have a larger than the norm personal collection from just doing what I do for the length of time I’ve done it for, but hardly ever reach for a lot of stuff and most definitely have a regular sized makeup bag with a core rotation of favourite essentials…not from an ungrateful/ wasteful point of view (I dip in to my stash and use a lot in my pro kit) but who has time everyday to not make making up as quick and as easy as possible??
What’s an everyday makeup bag essential for you??
Lyd x
PLEASE NOTE:
I’m now based in Cork, Ireland. Although I do still take select bookings for North Wales/ Cheshire and Dublin (get in touch for more info) and am available to travel country wide…I’m mainly taking makeup bookings for Cork City and surrounding areas.
As a bridal makeup specialist, I do get booked up well in advance so if you’re looking for wedding makeup in Cork contact me asap to check availability, secure your date and avoid disappointment! I’m freelance and travel to your home/ venue of choice.
Also available for makeup for any occasion/ event, lessons and master class makeup…find more information and a full list of services here.
Contact us for enquiries/ bookings and we’ll get back to you as soon as possible.
Cruelty free.